
When you visit a merchant by clicking a link on this site we may make a commission on anything you buy (at no additional cost to you). Affiliate programs and affiliations include, but are not limited to Amazon Associates and the eBay Partner Network.”
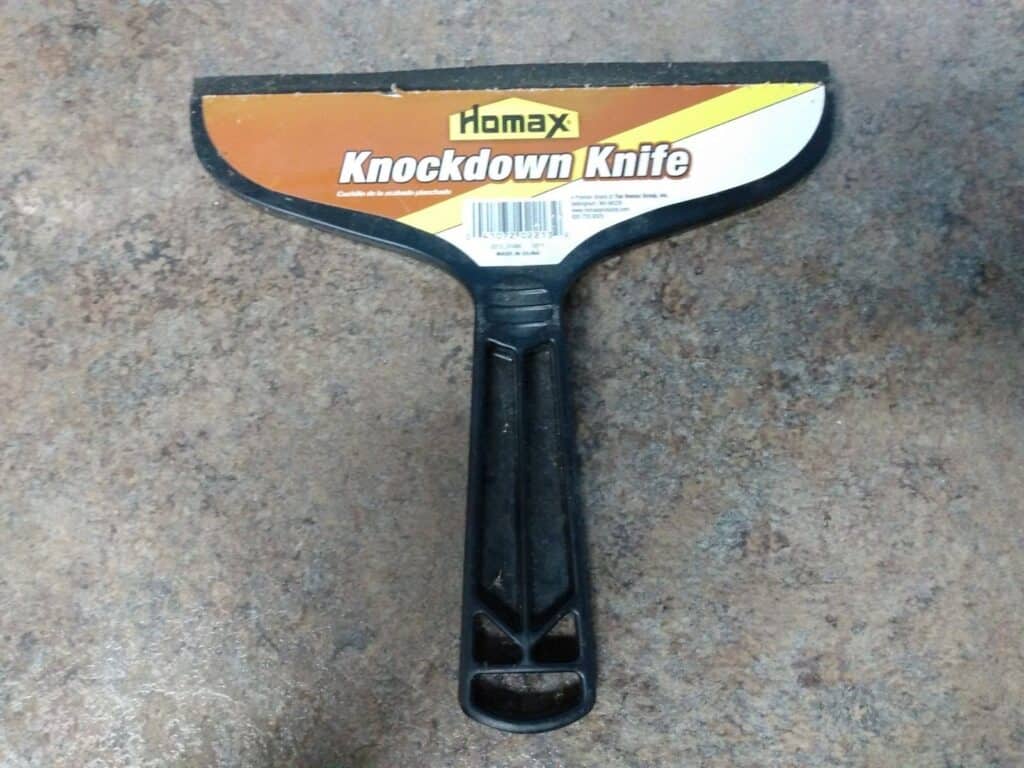
A knockdown knife is a specialized tool used primarily for creating textured patterns on drywall ceilings and walls. This versatile tool can be applied to either bare or painted drywall, allowing for a wide range of applications and different effects. The purpose of the knockdown knife is to gently shape the joint compound applied to the drywall, resulting in a unique visual texture that adds character and depth to a room.
To use a knockdown knife, first, apply a layer of joint compound to the desired surface. Once the compound is in place, run the knockdown knife over the texture in a straight line with light pressure. Typically, an 18-inch rubber blade knockdown knife is the preferred tool for this process, as it allows for easy control and even distribution of pressure across the surface. For harder-to-reach areas or larger projects, an extension pole can be attached to the handle of the knockdown knife to extend your reach. This ensures a consistent and professional-looking result, transforming your walls or ceilings with ease.
In summary, a knockdown knife is an indispensable tool for anyone looking to add visual depth and interest to their walls or ceilings through texture. Simple to use and adaptable to various surfaces, the knockdown knife offers endless possibilities for enhancing the aesthetic appeal of your spaces.
What Is a Knockdown Knife
A knockdown knife is a specialized tool used for applying and smoothing out knockdown texture on walls and ceilings. This tool helps create a unique finish that adds visual interest and hides imperfections in drywall. In this section, we’ll discuss the materials and design of knockdown knives, as well as the various sizes and varieties available.
Materials and Design
Knockdown knives are typically made of lightweight materials such as plastic and feature a handle and a flat, wide blade. One popular material for the blade is GE Lexan, a durable and flexible polycarbonate. Another common material is styrene, which is also lightweight and easy to work with. The handle is designed to be comfortable and easy to grip, and it may have a threaded design to attach extension poles when needed.
The blade is designed to provide the perfect amount of flexibility to spread the texture evenly without applying too much pressure or unevenness to the surface. There are straight and curved options, with the curved blade offering a more ergonomic angle for applying the knockdown texture.
Sizes and Varieties
Knockdown knives come in various sizes, usually ranging from 12 to 24 inches in width. The size you choose will depend on the area you’re working on and the desired texture appearance. Smaller knives, such as a 12-inch version, are suitable for smaller areas and more precise texture application, while larger knives, such as a 24-inch version, can cover larger surfaces more quickly and may create a more uniform texture. You can also find knockdown knives with adjustable-width blades, giving you the flexibility to switch between different widths for specific project requirements.
In summary, a knockdown knife is an essential tool for achieving a professional-looking knockdown texturing finish on walls and ceilings. With various materials, sizes, and designs to choose from, you can find the perfect knockdown knife to suit your specific project needs.
Using a Knockdown Knife
Preparing the Surface
Before starting, ensure the surface is clean, dry, and free from debris. If there are existing patches or repairs on the wall, sand them smoothly. For added protection, use masking tape to cover baseboards, electrical outlets, and other fixtures.
Applying the Texture
A popular technique to add wall texture is the knockdown texture method. To achieve this, mix the joint compound to the desired consistency. It should be thick enough to avoid dripping but thin enough to spread evenly. You can either use a trowel or a roller to apply the texture. For larger spaces, a hopper gun is advised for more efficient coverage.
When adding texture to drywall, it’s essential to prepare the paint. Mix it with joint compound to achieve the right consistency. Apply the mixture to the wall using a roller for a more uniform texture, or a trowel for a more defined pattern. The application method will depend on your desired wall finish, with options including popcorn texture, skip trowel, and others.
Smoothing and Finishing
Once the texture has been applied, wait for it to become partially dry— not too wet and not too dry. Now, it’s time to use a knockdown knife. Attach the knockdown knife to an extension pole if needed, so you can reach all areas of the wall or ceiling. Gently glide the edge of the knife in a straight line down the surface, applying light pressure. The goal is to flatten the peaks in the wall texture, not smooth it out completely 1.
For better control, some knockdown knives have a weighted handle that allows you to maintain even pressure throughout the entire process 2. Wipe the drywall knife’s edge with a water-dampened cloth after each pass to keep it clean and ready for the next smoothing action.
Remember to avoid leaving any noticeable lines or trowel marks, giving the finished texture a professional look. Once you’re satisfied with the final appearance, let the texture dry completely before painting or adding any additional wall finish.
Types of Textures
Knockdown Texture
Knockdown texture is a popular choice for both walls and ceilings. This technique involves applying watered-down joint compound with a trowel or spray hopper, then using a knockdown texture knife to smooth and flatten the compound. The result is a mottled, slightly rough surface that offers more visual interest than a simple flat finish.
Knockdown texture can be applied to bare or painted drywall, as long as the surface is blemish-free. To ensure a smooth and consistent application, it is important to:
- Prepare the surface by cleaning and repairing any damage
- Mix the joint compound to the correct consistency, allowing for a “slaking” period for complete water absorption
- Use the appropriate tools, such as a knockdown texture knife or specialty tools, to achieve the desired angle
Orange Peel Texture
Orange peel texture is another common type of wall and ceiling texture that resembles the surface of an actual orange peel. It is created by spraying a mixture of joint compound and water onto the surface using a texture sprayer. The compound forms small, round bumps on the surface, which are then left to dry without any further manipulation.
To achieve a consistent orange peel texture, it is essential to:
- Prepare the surface by cleaning and repairing any damage
- Mix the joint compound and water to a uniform, sprayable consistency
- Use a texture sprayer with the appropriate nozzle size for the desired effect
Popcorn Texture
Popcorn texture, also known as acoustic texture or cottage cheese texture, is a thick, bumpy texture applied to ceilings. This texture is created by mixing joint compound with a Styrofoam-like material, then spraying the mixture onto the ceiling using a texture sprayer. The mixture is quite thick, allowing it to adhere to the ceiling and form large, irregular bumps.
Popcorn texture can be used to conceal imperfections in the ceiling, provide some sound insulation, and add visual interest. To apply popcorn texture, it is crucial to:
- Prepare the ceiling by cleaning and repairing any damage
- Mix the joint compound and Styrofoam-like material to the correct consistency
- Use an appropriate texture sprayer with a hopper and nozzle designed for popcorn texture application
Repair and Maintenance
Fixing Small Damages
A knockdown knife is a useful tool for wall texture repair, especially when dealing with small damages on textured surfaces. To fix minor imperfections, start by cleaning the damaged area and applying a spackling compound. Once the compound dries, use a fine-grit sandpaper to smooth the surface and remove any flaws. Achieving a blemish-free finish is essential before proceeding to the repainting or refinishing process.
To repair the wall texture, mix drywall mud or drywall joint compound to create a soupy consistency. Utilizing a hopper gun, spray the mixture onto the damaged area while creating stalactite-like peaks. After a brief waiting period, use the knockdown knife to flatten the peaks and blend the new texture with the existing surface. This technique effectively eliminates surface imperfections and prepares the wall for repainting or refinishing.
Repainting
Before repainting a repaired textured wall, apply a primer to ensure proper paint adhesion and coverage. Homax offers products specifically designed for priming textured surfaces. Once the primer dries, proceed with the painting process. It is essential to use the appropriate paint type and technique to maintain the wall’s desired texture and appearance. When repainting textured walls, apply multiple thin coats to avoid hiding the texture or creating an uneven surface.
Refinishing
Refinishing a textured wall involves repair and repainting steps, with additional attention to enhancing the overall quality and longevity of the wall’s surface. Start by priming and painting the repaired area as previously described. After the paint dries, consider applying a protective clear finish or sealant to the wall to protect the new texture from future damages and wear. By following proper refinishing techniques, your textured wall will remain attractive and endure the test of time.
Pros and Cons of Knockdown Textured Surfaces
Advantages
- Easy-to-clean: Knockdown texture is relatively low maintenance, as the textured surface can be cleaned with a damp cloth or sponge, making it easier to remove dirt and debris compared to flat paint surfaces.
- Hides imperfections: Textured walls can help camouflage minor imperfections such as dents, dings, and uneven surfaces, providing a more uniform appearance overall.
- Versatile application: The knockdown technique can be applied using a variety of tools, including a knockdown knife, paintbrush, or a trowel. For larger areas, an air compressor and spray texture can be used for a more efficient application.
- Aesthetic appeal: The unique pattern created by knockdown texture adds depth and visual interest to walls and ceilings, breaking up the monotony of smooth surfaces.
Disadvantages
- Requires skill: Applying knockdown texture requires a certain level of skill and practice, as it can be challenging to achieve a consistent pattern. If you are inexperienced, it may be best to hire a qualified handyman to ensure a professional result.
- Can be difficult to paint: Textured surfaces may require additional paint and primer compared to smooth surfaces, as the texture can absorb more paint. It is important to use the right type and amount of paint to avoid overloading the texture and flattening it.
- Potential damage: The raised texture can be prone to chipping or peeling, especially in high-traffic areas. It may require periodic touch-ups or repairs to maintain its appearance.
- May be challenging to remove: While knockdown texture has its benefits, it can be more difficult to remove or restore to a smooth surface than other types of wall textures. This may require additional labor and materials, increasing the overall cost and effort.
By considering these advantages and disadvantages, homeowners can make an informed decision about whether to go with knockdown textured surfaces or choose another wall treatment.
Conclusion
The knockdown knife, while a relatively simple tool, holds an essential place in the world of home improvement and design. Its versatility and ease of use make it a key player in creating a variety of textured patterns on drywall, adding depth and visual interest to any room. However, this tool doesn’t just beautify; it also provides an effective solution to hide imperfections, potentially saving on the costs of more extensive repairs.
Yet, as with any tool or technique, the knockdown texture does come with its set of challenges, including the skill needed to achieve a consistent pattern and the potential for damage over time. Nonetheless, with careful handling, the right materials, and a bit of practice, anyone can master the technique of applying a knockdown texture.
Overall, whether you’re a professional contractor or a DIY enthusiast, the knockdown knife offers a versatile solution for enhancing the aesthetic appeal of walls and ceilings, demonstrating that sometimes, it’s the simplest tool that can make the most significant impact.
What Is A Santoku Knife? (And When To Use One…)

N690 vs 154CM – Which Makes Better Knives?
Are Butterfly Knives Illegal? (In Which States & Why…)
Elmax vs Magnacut – Battle of the Blade Steels

SG2 vs VG10 Comparison (Which Is The Better Knife Steel?)
Do Sheepsfoot Blades Have A Purpose? (Cuz They’re Ugly…)
When you visit a merchant by clicking a link on this site we may make a commission on anything you buy (at no additional cost to you). Affiliate programs and affiliations include, but are not limited to Amazon Associates and the eBay Partner Network.”